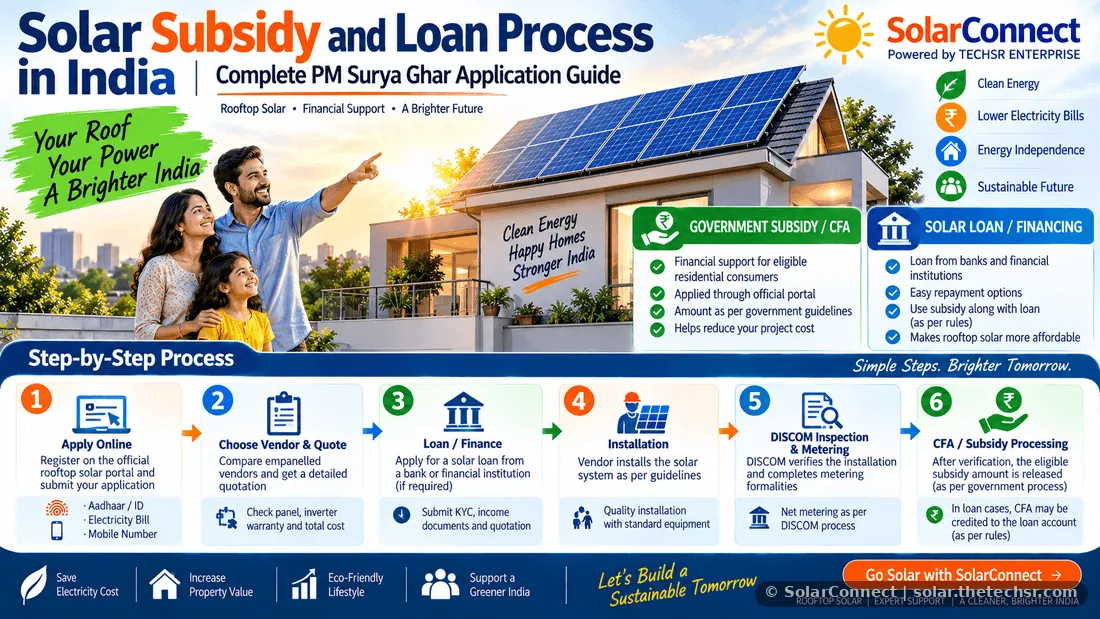
Solar Subsidy and Loan Process in India: Complete PM Surya Ghar Application Guide
Learn how residential customers can apply for rooftop solar subsidy and financing in India. This practical guide explains eligibility, documents, vendor selection, application steps, DISCOM approval, installation, inspection, net metering, subsidy/CFA processing and important points to check before taking a solar loan.
Solar Subsidy and Loan Process in India: Complete PM Surya Ghar Application Guide
Installing rooftop solar can reduce electricity purchases from the grid and help households use renewable energy. For eligible residential consumers in India, the PM Surya Ghar: Muft Bijli Yojana provides Central Financial Assistance (CFA) for eligible grid-connected rooftop solar installations.
The subsidy is not simply an instant discount available on every solar purchase. The consumer needs to follow the applicable application, vendor, installation, DISCOM verification and documentation process.
This guide explains the process in simple steps so that homeowners, solar dealers and sales teams can understand the main requirements before starting an application.
What Is PM Surya Ghar: Muft Bijli Yojana?
PM Surya Ghar: Muft Bijli Yojana is the Government of India's rooftop solar programme for residential consumers. The scheme is implemented through the national rooftop solar portal and related DISCOM processes.
The Ministry of New and Renewable Energy provides the official operational guidelines and subsequent clarifications or amendments. Because scheme rules can change, applicants should always verify the latest information before submitting an application.
Visit the official PM Surya Ghar portal for the current application process.
Who Should Read This Guide?
This guide is useful for:
- Residential electricity consumers
- Homeowners planning rooftop solar
- Solar dealers
- Solar sales executives
- Solar installers
- EPC companies
- Channel partners
- Customers considering solar financing
What Is Solar CFA or Subsidy?
CFA means Central Financial Assistance. For eligible residential rooftop solar systems under the applicable scheme guidelines, the CFA is calculated according to the approved structure and eligible capacity.
Under the scheme structure published by MNRE, CFA is provided for the first 2 kW at 60% of the applicable benchmark cost and for an additional 1 kW at 40% of the applicable benchmark cost. There is no additional CFA beyond 3 kW under that structure. The applicable amount and rules should always be checked against the latest official notification before quoting a customer.
The official scheme documents also specify eligibility conditions for the residential installation and the equipment used. 0
Important: Subsidy Is Not the Same as a Loan
A solar subsidy and a solar loan are two different things.
Subsidy/CFA: Financial assistance provided under the applicable government scheme to eligible consumers.
Solar loan: Financing provided by a bank or financial institution and repaid by the customer according to the approved loan terms.
A customer may use a loan to finance the eligible solar installation and separately receive the applicable CFA after completing the required process.
Can the Subsidy Be Used With a Solar Loan?
Yes, the scheme framework provides for cases where the consumer finances the rooftop solar installation through a loan. Official programme documentation provides for the CFA to be transferred to the beneficiary's loan account in applicable cases, subject to the scheme process and approved documentation.
Where the admissible CFA exceeds the loan amount drawn, the applicable mechanism can provide for the balance to be transferred to the consumer's bank account according to the scheme rules. 1
Basic Solar Subsidy and Loan Process
The overall process can be understood as the following sequence:
- Check basic eligibility.
- Keep electricity and identity documents ready.
- Register on the official rooftop solar portal.
- Submit the rooftop solar application.
- Complete the required DISCOM process.
- Select an eligible/empanelled vendor through the applicable process.
- Receive or confirm the project quotation.
- Arrange payment or apply for a suitable solar loan.
- Install the rooftop solar system.
- Complete DISCOM inspection and required documentation.
- Complete applicable metering/net-metering formalities.
- Submit or complete the required subsidy/CFA claim process.
- Receive CFA according to the applicable scheme process.
Step 1: Check Your Basic Eligibility
Before starting the application, confirm that the proposed installation fits the applicable residential rooftop solar requirements.
Important points include:
- The electricity connection should meet the applicable residential requirements.
- The proposed system should be a qualifying grid-connected rooftop solar installation.
- The installation should comply with the applicable technical requirements.
- The selected equipment should meet the applicable scheme requirements.
- The installation should be completed through the applicable vendor and DISCOM process.
Do not assume eligibility only because you own a house. The electricity connection, system configuration, documentation and scheme conditions also matter.
Step 2: Keep Your Documents Ready
The exact document requirements can vary depending on the portal, DISCOM and financing institution. Customers should keep commonly requested documents ready.
- Recent electricity bill
- Consumer/account number
- Registered mobile number
- Identity proof
- Bank account details
- Cancelled cheque or bank verification document where required
- Property or installation-related information where required
- Solar quotation
- Loan documents, if financing is selected
Always follow the document checklist shown on the official portal and the customer's bank or DISCOM.
Step 3: Register on the Official Portal
The rooftop solar application process is handled through the official government portal and applicable DISCOM systems.
Start by using the official PM Surya Ghar portal rather than an unofficial website or agent asking for unnecessary fees.
Open the official PM Surya Ghar website
The Ministry's National Portal for Rooftop Solar also provides information about the application process and DISCOM portal links.
Step 4: Submit the Rooftop Solar Application
Enter the required consumer and electricity connection information carefully.
Before submitting:
- Check the consumer number.
- Check the registered mobile number.
- Confirm the DISCOM details.
- Review the installation address.
- Check the proposed system capacity.
- Save application/reference information.
A mistake in the consumer information can create delays during later stages of the process.
Step 5: Choose the Solar Vendor
Vendor selection is an important part of the process.
Customers should compare vendors based on:
- Applicable empanelment/eligibility
- Solar panel specifications
- Inverter specifications
- Warranty
- Installation quality
- Mounting structure
- Protection equipment
- After-sales service
- Quotation transparency
- Installation timeline
The official rooftop solar portal provides vendor-related information and the applicable vendor process. 2
Step 6: Get a Complete Solar Quotation
A professional quotation should clearly explain the complete system.
It should ideally mention:
- Solar panel manufacturer and model
- Total solar capacity
- Number of modules
- Inverter manufacturer and model
- Mounting structure
- DC and AC cables
- Protection equipment
- Earthing requirements
- Installation charges
- Taxes
- Applicable subsidy/CFA assumptions
- Net payable amount
- Warranty
- Payment schedule
Never accept a quotation that simply says "3 kW solar package" without explaining what equipment and services are included.
Step 7: Apply for a Solar Loan
If the customer does not want to pay the complete installation cost from personal funds, they can explore a suitable solar loan offered by a participating bank or financial institution.
The loan is subject to the lender's own eligibility, credit assessment, documentation, interest rate, tenure, processing charges and other terms.
Government subsidy eligibility does not automatically guarantee loan approval.
Common Loan Documents
The bank or lender may request documents such as:
- Identity proof
- Address proof
- PAN or applicable tax identification
- Bank account information
- Income documents
- Recent bank statements
- Electricity bill
- Solar quotation
- Vendor details
- Property-related documents where required
The exact list depends on the lender and the applicant's profile.
What Does the Bank Check?
A lender may evaluate:
- Applicant identity
- Income and repayment capacity
- Existing liabilities
- Credit history
- Banking history
- Solar project quotation
- Vendor information
- Loan amount requested
- Other lender-specific requirements
Approval, interest rate and loan tenure are determined by the lender according to its policies and the customer's profile.
Step 8: Understand the Loan Before Signing
Customers should not look only at the monthly EMI.
Before accepting the loan, check:
- Total loan amount
- Interest rate
- Fixed or floating rate, if applicable
- Loan tenure
- Monthly EMI
- Processing fee
- Insurance or additional charges, if applicable
- Prepayment conditions
- Late-payment charges
- Total amount payable over the loan period
Ask the lender for a complete repayment schedule before signing the agreement.
Step 9: Solar Installation
After the required approvals, vendor confirmation and financing arrangements, the solar system can proceed to installation according to the applicable process.
The installer should properly install:
- Solar modules
- Mounting structure
- Inverter
- DC cables
- AC cables
- Protection equipment
- Earthing
- Monitoring equipment where applicable
Installation should follow applicable electrical, structural and programme requirements.
Step 10: DISCOM Inspection and Verification
After installation, the applicable DISCOM process may include physical inspection, documentation checks and metering-related formalities.
Official MNRE material states that the DISCOM conducts the required inspection and completes applicable documentation before the CFA process proceeds. 3
Step 11: Net Metering or Applicable Metering Process
For grid-connected rooftop solar, the applicable metering arrangement must be completed according to the relevant DISCOM rules.
The exact procedure can vary between states and distribution companies.
Customers should follow their DISCOM's instructions rather than relying only on information from a salesperson.
Step 12: Subsidy/CFA Processing
After the required installation, inspection and documentation conditions are satisfied, the CFA is processed according to the scheme mechanism.
Official programme documentation describes a process involving verification and release of the eligible CFA. In loan-financed cases, the CFA can be credited to the applicable loan account according to the programme process. 4
The actual processing time can depend on document completeness, inspection, DISCOM processing and other programme conditions.
How the Money Flow Can Work
A simplified example can help customers understand the process.
| Component | Example |
|---|---|
| Total solar project cost | ₹2,00,000 |
| Customer's own contribution | ₹50,000 |
| Loan amount | ₹1,50,000 |
| Eligible CFA | As determined under the applicable scheme |
| CFA destination in loan case | Applicable loan account, subject to scheme process |
This is only an illustrative example. It is not a guaranteed subsidy amount or loan structure. The actual CFA, project cost, loan amount and repayment terms must be confirmed from the current government guidelines, vendor quotation and lender.
Important Things Customers Should Not Do
- Do not assume every solar system qualifies for government subsidy.
- Do not pay an unknown person simply because they promise faster subsidy approval.
- Do not submit incorrect electricity connection information.
- Do not choose a vendor only because the quotation is cheapest.
- Do not sign a loan agreement without checking the total repayment cost.
- Do not assume loan approval is guaranteed.
- Do not assume the subsidy will be paid immediately after installation.
- Do not rely on outdated subsidy figures.
Important Things for Solar Dealers and Sales Teams
Solar salespeople should explain the subsidy and loan process carefully.
A professional sales conversation should clearly separate:
- Solar system price
- Government CFA/subsidy
- Customer contribution
- Loan amount
- Interest and financing charges
- Installation charges
- Taxes
- Other applicable charges
Never advertise a government subsidy as a guaranteed discount without confirming the customer's eligibility and current scheme rules.
Solar Subsidy Application Checklist
- Residential electricity connection verified
- Recent electricity bill available
- Mobile number verified
- Bank account details ready
- Identity documents ready
- Eligible vendor selected
- Solar quotation checked
- System capacity confirmed
- Loan requirement assessed, if applicable
- Application submitted through the official process
- Installation completed
- DISCOM inspection completed
- Metering formalities completed
- Required documents submitted
- CFA/subsidy status checked on the official portal
West Bengal Customers: Check Your DISCOM
Customers in West Bengal should first identify the distribution company serving their electricity connection. The National Rooftop Solar Portal provides DISCOM-specific information and portal links.
For example, the official portal lists WBSEDCL and other West Bengal distribution utilities in its DISCOM information. 5
Always use the applicable DISCOM's official process for connection, inspection and metering requirements.
Where to Get Official Help
For questions about rooftop solar subsidy structure, application procedure and vendor-related matters, the National Rooftop Solar Portal provides official support information.
The portal lists rts-support@gov.in for rooftop solar scheme-related information and itsupport-mnre@nic.in for portal-related technical problems. 6
Final Checklist Before Installing Solar
Before making the final payment or signing a financing agreement, make sure you understand:
- What solar system is being installed?
- Which panels and inverter are being supplied?
- What is the complete project price?
- What amount is expected from the customer?
- What CFA/subsidy is actually applicable?
- What is the loan amount?
- What is the interest rate?
- What is the total repayment amount?
- What are the warranty terms?
- Who will handle DISCOM-related formalities?
- What happens if the subsidy process is delayed?
- What after-sales support is included?
Conclusion
Solar subsidy and solar loans can make rooftop solar more accessible to eligible residential customers, but the process should be followed carefully.
The most important steps are to verify eligibility, apply through the official portal, select the appropriate vendor, understand the complete quotation, arrange financing if required, complete installation and DISCOM verification, and then follow the applicable CFA/subsidy release process.
Government subsidy rules, eligible equipment requirements, financing products and portal procedures can change. Therefore, customers should always verify the latest information from MNRE, the official PM Surya Ghar portal, their DISCOM and the selected lender before making a financial commitment.
Understand the subsidy. Understand the loan. Understand the complete solar quotation. Then make the installation decision.
The official MNRE sources confirm that the PM Surya Ghar framework has been amended and clarified over time, so using current official information is particularly important when publishing subsidy amounts or loan-process claims.More Questions People Ask
How do I apply for PM Surya Ghar online?
To apply for PM Surya Ghar online, visit the official portal pmsuryaghar.gov.in, select your state and electricity distribution company, and enter your consumer number and mobile number. After registration, log in, fill in the rooftop solar application form and submit it. Once you receive feasibility approval from your DISCOM, choose a registered vendor to install the system.
What documents are needed for the PM Surya Ghar online application?
Keep a recent electricity bill showing your consumer number, an identity proof such as Aadhaar, a mobile number and email ID, and your bank account details for the subsidy transfer. Proof of roof ownership or consent may also be requested. Requirements can change, so always check the latest list on pmsuryaghar.gov.in before you apply online.
Can I apply for PM Surya Ghar online without a vendor?
Yes. Any eligible household can register and apply on the official portal by itself. A registered vendor is needed for installation, which you select after feasibility approval. Pro Power Energies is a registered PM Surya Ghar vendor, and SolarConnect carries out the installation work, helping customers through the online steps if they want support. See our PM Surya Ghar guide for more.
How long does the PM Surya Ghar process take after applying online?
The timeline depends on your DISCOM's feasibility check, the installation schedule, net meter installation and inspection. After commissioning, you upload the required details and bank information on the portal, and the subsidy is released after verification. Times differ by state and season, so track every stage by logging in to pmsuryaghar.gov.in.
Can I get a loan along with the PM Surya Ghar online application?
Yes. The portal provides information about loan options from participating banks for rooftop solar. You can explore financing after your application is registered. Loan terms, interest rates and eligibility are set by the lenders, so confirm the details directly with the bank. More common questions are answered on our solar FAQ page.
Source: SolarConnect India – solar.thetechsr.com
Back to Solar Blog